• Home
  • Shell
    • Emacs
    • Perl
    • screen
    • sed
  • Ubuntu
    • VNC
  • Web Development
    • Javascript
    • Joomla
    • MySQL
    • osTicket
  • Windows
    • Gimp

Posts in category Ubuntu

BASH> Functions

Mar22
2013
Written by Scott Rowley

The beginning of a list of any functions I have created or found and deem useful:

This function will allow you to type “up ANY_NUMBER” and move that many directories up in the current directory tree you are in. If you you do not specify a number and instead just type ‘up’ by itself you will automatically go up just one directory.

function up ()
{
if (( $#> 0 )); then
COUNTER=$1;
else
COUNTER=1;
fi;
while (( ${COUNTER}> 0 )); do
UP="${UP}../";
(( COUNTER=${COUNTER}-1 ));
done;
echo "cd $UP";
cd $UP;
UP=''
}

Some servers don’t have ‘watch’ installed so I’ve made my own function to replicate it’s basic functionality (updated to work with pipes!)

function mywatch () {
while true
do
clear
date +'%D %r'
echo ''
cmd=`echo $@`
#echo "Command is '$cmd'"
last=`echo $@ | awk {'print $NF'}`
num='^[0-9]+$'
if [[ $last =~ $num ]]; then
cmd=`echo $cmd | sed "s^$last^^g"`
eval "$cmd"
sleep $last
else
eval "$cmd"
sleep 2
fi
clear
done
}

Useage:

mywatch "ls -al" 5

If a second parameter ($2) is not supplied (in this case 5) then 2 will be used and your watch will refresh every 2 seconds.

Easily locate problem directories when space is low on a server. Add the following function to your profile (.profile / .bashrc / etc)

function spaceHog ()
{
du -k | sort -n | awk '
BEGIN {
split("KB,MB,GB,TB", Units, ",");
}
{
u = 1;
while ($1>= 1024) {
$1 = $1 / 1024;
u += 1;
}
$1 = sprintf("%.1f %s", $1, Units[u]);
print $0;
}'
}

Useage:

[17:25:51][user@server][ ~ ]
[$]> spaceHog | tail -10 # To show the 10 largest, change this number as desired.
247.5 MB ./bin
247.8 MB ./.cache/google-chrome/Default
247.8 MB ./.cache/google-chrome
283.4 MB ./.cache
293.2 MB ./.wine/drive_c/Program Files (x86)
423.5 MB ./Downloads
653.6 MB ./IOS_APPS
655.1 MB ./.wine/drive_c
658.2 MB ./.wine
2.7 GB .

Delete (rm) a file by it’s inode number

Occassionally I will (or others will) run a command that ends up accidentally creating some goofy named files such as ‘?[01’. This is actually a character so you can’t just type it in to delete it. For this you can lookup the file name by it’s inode and then delete it.

You can do an ls with an -i option to get the inodes, for example:

[$]> ls -ali
total 8
295188 drwxr-xr-x 2 sasowner sas 4096 Dec 30 11:26 .
295064 drwx------ 23 sasowner sas 4096 Dec 30 11:26 ..
295406 -rw-r--r-- 1 sasowner sas 0 Dec 30 11:26 file1
295407 -rw-r--r-- 1 sasowner sas 0 Dec 30 11:26 file2
295408 -rw-r--r-- 1 sasowner sas 0 Dec 30 11:26 file3
295409 -rw-r--r-- 1 sasowner sas 0 Dec 30 11:26 file4

You could then follow this up with a command such as:

[$]> find . -inum 295409 -exec rm {} \;

However, you probably won’t use this command often enough to remember it unless you are regularly familiar with the find command. Instead, I’ve create the following simple function:

function rmi ()
{
find . -inum $1 -exec rm -i {} \;
}

Then simply type the following after getting the inode of the file

[$]> rmi ######
Posted in BASH - Tagged alias, bash_profile, bashrc, cd, clear, COUNTER, date, directory, function, monitor, move, navigate, profile, sleep, up, watch

Usenet> Newznab backfilling

Jan31
2013
Written by Scott Rowley

I’ve recently been checking out newznab plus. I’ve found that while it’s nice as it slowly builds, it’s a bit annoying not having any older posts already loaded. Fortunately nn+ (nnp, newznab plus) comes with an option for backfilling. The instructions are useful but I’d like to expand on them to make it less of a hassle to update more than one particular group.

Please note that I’ve only been using nn+ for a few days now so there may indeed be easier ways to do things but this is the best way I’ve found so far. For example, I’m not exactly sure what the update_binaries_threaded.php file does but I don’t believe it does what I’m discussing here. I’m guessing from the “threaded” that it simply makes multiple threads of the same process to make the entire task faster.

The following is taken from http://newznab.readthedocs.org/en/latest/readme/#backfilling-groups

Backfilling Groups
Since most usenet providers have 800+ days of retention indexing all that information in one shot is not practical. Newznab provides a backfill feature that allow you to index past articles once your initial index has been built. To use the feature first set the back fill days setting in the group(s) to be backfilled to the number of day you wish to go back, making sure to set it higher than the number of days listed in the first post column. Once set run the backfill.php script in misc/update_scripts. Groups can be backfilled to a particular date using the script misc/update_scripts/backfill_date.php using the syntax:

php backfill_date.php 2011-05-15 alt.binaries.groupname.here

You can use the _threaded version of this script if on linux.

For more information on backfilling, see Update Scripts.

First off, what we need to do is to activate any groups we want. More than likely you’ve already done this. What you’ll want to do in order to backfill those groups is to change the ‘Backfill Days’ entry. This can be done through the webpage but if you are wanting to backfill all of them then this following command will make it much faster than manually clicking through a dozen or more groups.

You’ll need to be on the command line and then log into mysql

mysql -u root -p
Enter password:
mysql> use newznab; (or whatever your database name is)
mysql> update groups set backfill_target=365 where active=1;

You have now just changed all active groups to have a backfill of 365 days (1 year). Now we just need to run our backfill_date.php on each group. If we’ve got dozens of groups or more though this can be tedious to repeat over and over with each group. So instead we are going to get a list of all the active groups by running the following command:

mysql -u root -p newznab -e 'select name from groups where active=1;'> groups.txt

You can now go into the groups.txt file and remove and additional groups you want or just leave it intact if you want everything.

Finally we want to run the php backfill.php command to backfill each of our selected groups back 365 days (or whatever number you’ve selected, alternatively you can also skip updating the database with the amount of days to backfill and simply substitute the backfill_date.php as noted from the link.)

Normally this command would be run like so for a single group:

php backfill.php alt.binaries.groupname.here

But this is much too slow for multiple groups so we are going to use a ‘for’ function with our data from the groups.txt file we created.

for group in `cat groups.txt`; do php backfill.php $group; done

If you are like me and like to see your code before it runs then simply add an echo beforehand to view the results and then remove it when you are ready:

for group in `cat groups.txt`; do echo "php backfill.php $group"; done

The use of the backticks (`) around ‘cat groups.txt’ tells it to run the command in a subshell and then use the information from that back in the shell command.

Posted in BASH, PHP - Tagged backfill, backfill days, BASH, for, groups, MySQL, newznab, newznab plus, nn+, nnp, php, update, usenet

vmWare> Boot to fullscreen VM after host boots.

Nov02
2011
Written by Scott Rowley

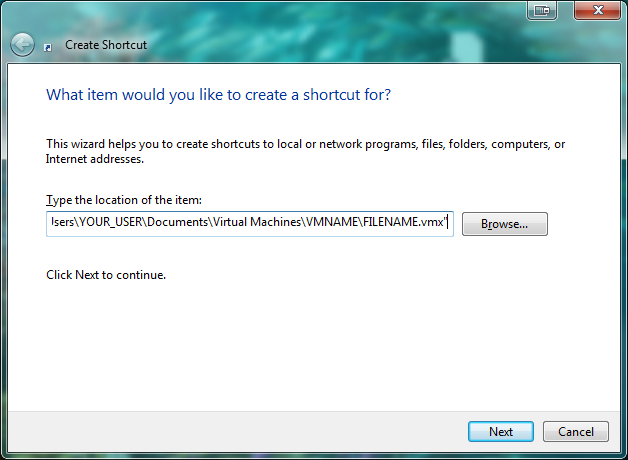
Create a shortcut with the following TARGET.

“C:\Program Files\VMware\VMware Workstation\vmware.exe” -X “C:\Users\YOUR_USER\Documents\Virtual Machines\VMNAME\FILENAME.vmx”
New Shortcut

The -X opens in Full screen (before you go looking, I’ll save you the trouble — there is no dual screen option as of the writing of this article.)
Replace “C:\Users\YOUR_USER\Documents\Virtual Machines\VMNAME\FILENAME.vmx” with your vmx file location.
The quotes are required.

Put the shortcut into the Windows Startup folder
Windows Startup Folder

Voila!
Ubuntu

Posted in vmWare, Windows - Tagged fullscreen, host, vmware, workstation boot

Media> Shoutcast ‘No such file or directory’

Jul29
2011
Written by Scott Rowley

You’ve got a 64-bit operating system and you are trying to run the 32-bit variant of Shoutcast.

32-bit Shoutcast on 64-bit OS

# ./sc_serv
-bash: ./sc_serv: No such file or directory

For CentOS, RedHat and Similar:

yum install lib32-glib

For Debian/Ubuntu:

apt-get install ia32-libs
# ./sc_serv
*******************************************************************************
** SHOUTcast Distributed Network Audio Server
** Copyright (C) 1998-2004 Nullsoft, Inc. All Rights Reserved.
** Use "sc_serv filename.ini" to specify an ini file.
*******************************************************************************
Tagged apt-get, audio, cast, directory, file, ia32-libs, install, media, no, shout, shoutcast, such, yum

Linux> Aliases

Jun08
2011
Written by Scott Rowley

Aliases can be a great way to more easily remember an oddball command or to shorten a long command. Aliases are stored in your .profile (or .bash_profile) or within a include file referenced from .profile.

A couple of quick examples before showing how to set them up:
READ MORE »

Posted in BASH - Tagged alias, basic, conditional, epoch, ggrep, grep, if, include, linux, Perl, print, profile, reload, solaris, time, ubuntu, unix, whois

Linux> Command line shortcuts

Jun06
2011
Written by Scott Rowley

Another starter article to grow with my needs, we’ll start off with the shebang, or bang…or simply “!”. The first two commands I believe are the most useful and could be commonly used. Note that some of these can be a bit difficult to remember, we’ll also go over making aliases so we can use something a little easier to remember in a later article.
READ MORE »

Posted in BASH - Tagged !, bang, command, date, exclamation, execute, home, last, previous, print, prior, shebang, shortcut, tilde

Web Dev> Password protect webpage(s) with PHP & LDAP

May27
2011
Written by Scott Rowley

The title says it all, this will allow you to restrict the access to a page or pages running php with access to LDAP. I’ve used this a few times for some internal things we don’t want everyone getting access to or similar scenarios. As always if it works for you, please leave a comment and if it doesn’t please leave a question and I’ll see what I can do to help you out.

Enable LDAP

First thing you’ll need to do is to install ldap for php & enable the needed mods, ldap.load & authnz_ldap.load

On Ubuntu:

apt-get update
apt-get install php5-ldap
cd /etc/apache2/mods-enabled
ln -s ../mods-available/ldap.load ldap.load
ln -s ../mods-available/authnz_ldap.load authnz_ldap.load
apache2ctl graceful

READ MORE »

Posted in Web Development - Tagged apache, apache2ctl, authnz_ldap.load, graceful, ldap, ldap.load, login, mods-available, mods-enabled, php, php5-ldap, restricted, secure, security

Web Dev> Password protect apache directory with LDAP & .htaccess

Apr06
2011
Written by Scott Rowley

First thing you’ll need to do is to enable the needed mods, ldap.load & authnz_ldap.load These come preloaded with most linux, you’ll just need to enable them.
On Ubuntu:

Enable LDAP Authentication

cd /etc/apache2/mods-enabled
ln -s ../mods-available/ldap.load ldap.load
ln -s ../mods-available/authnz_ldap.load authnz_ldap.load
apache2ctl graceful

.htaccess

You should now be able to implement the following wherever desired:
Example .htaccess file

Order deny,allow
Deny from All
AuthName "Restricted Page - login with LDAP credentials"
AuthType Basic
AuthBasicProvider ldap
AuthzLDAPAuthoritative on
AuthLDAPUrl ldap://ldap.example.com/ou=admins,o=LDAPROOT?adminUser
AuthLDAPGroupAttribute memberUid
AuthLDAPGroupAttributeIsDN off
Require valid-user
Satisfy any
<Files .htaccess>
order allow,deny
deny from all
</Files>

Note that ‘?adminUser’ on the end of the AuthLDAPUrl line is whatever object you use in your configuration.

Apache Config

/etc/apache2/sites-available/default
Make sure the following is set (the default is AllowOverride AuthConfig)

AllowOverride All
Posted in Web Development - Tagged htaccess, ldap, password, protect, security, ubuntu

Web Dev> Force users from http to https

Apr05
2011
Written by Scott Rowley

Tested and verified working for *nix servers:

Add the following to your .htaccess file in the root of your website:

Options +FollowSymlinks
RewriteEngine on
RewriteCond %{SERVER_PORT} =80
RewriteRule ^(.*) https://%{SERVER_NAME}%{REQUEST_URI}

I don’t work with IIS so check the following link for information on setting up the redirect on IIS servers:
http://www.sslshopper.com/iis7-redirect-http-to-https.html

Posted in Web Development, Windows - Tagged apache, follow, force, htaccess, http, https, IIS, nix, options, rewrite, server, symlinks, user

Ubuntu 10.10 VNC Login Screen

Apr04
2011
Written by Scott Rowley

This procedure starts from a fresh install of Ubuntu-Desktop-10.10. This will allow for a graphical interface where none otherwise exists (such as is needed with remote desktop connection). Bear in mind that with VNC you will not have any sound as its not capable (at least not yet)

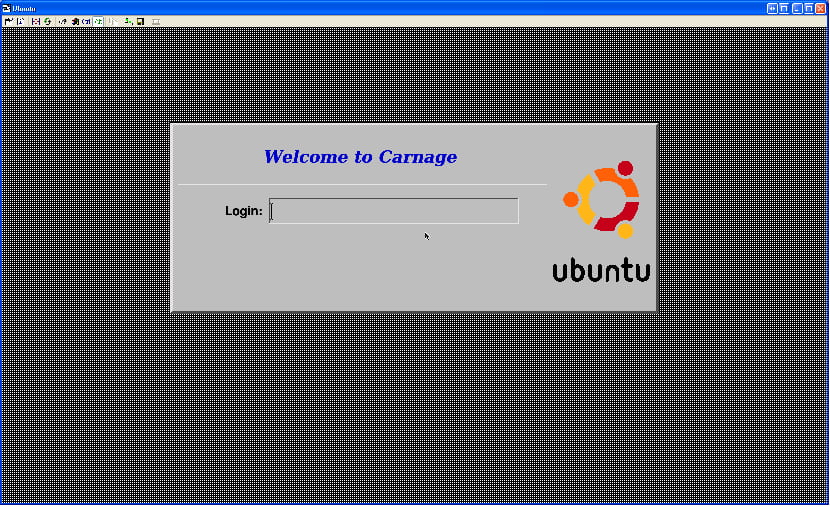
Login Screen Desktop

install xdm, vnc4server, and xinetd.

sudo apt-get install xdm vnc4server xinetd

When asked during installation what the default display manager should be, keep the setting as gdm.

Configure xdm to be able to answer XDMCP requests, comment out the following line in /etc/X11/xdm/xdm-config:

! SECURITY: do not listen for XDMCP or Chooser requests
! Comment out this line if you want to manage X terminals with xdm
!DisplayManager.requestPort: 0

Configure XDM to answer XDMCP requests from localhost, and to listen to just localhost by adding the following lines to /etc/X11/xdm/Xaccess:

localhost
LISTEN localhost

Configure XDM to not bring up a physical display by commenting out the following line in /etc/X11/xdm/Xservers:

#:0 local /usr/bin/X :0 vt7 -nolisten tcp

Configure the startup script to allow XDM to start despite gdm taking care of the screen by removing /etc/X11/default-display-manager:

sudo mv /etc/X11/default-display-manager /etc/X11/default-display-manager.original
emacs /etc/X11/default-display-manager (to contain ONLY the following):
/usr/bin/xdm

Add the VNC port definition to /etc/services if it has not already been added:

vnc 5900/tcp

Configure the VNC incoming port by creating /etc/xinetd.d/vnc:

service vnc
{
     only_from = localhost 192.168.0.1/24
     disable = no
     id = vnc
     socket_type = stream
     protocol = tcp
     wait = no
     user = nobody
     server = /usr/bin/Xvnc4
    server_args = -geometry 1650x950 -inetd -query localhost -once -SecurityTypes=None -pn -fp /usr/share/fonts/X11/misc/,/usr/share/fonts/X11/75dpi/,/usr/share/fonts/X11/100dpi/ -desktop Ubuntu
     log_on_failure += USERID
}

Feel free to modify these options (such as your “only_from” to be your actual network or IP — and geometry to be your desired resolution)

After all these pieces are done, restart the services to load the new configurations:

sudo /etc/init.d/xdm restart
sudo /etc/init.d/xinetd restart

Now you should be able to use VNC to get a login screen.

There is a problem with gnome in this setup where it has a keyboard shortcut assigned to ‘d’, which can be fixed by going into System -> Preferences -> Keyboard Shortcuts and disabling, or reassigning the “Hide all normal windows and set focus to the desktop” shortcut key (source). This may happen because the default key binding is Mod4+D, and there is no Mod4 modifier key on the VNC connection.

Enabling copy/paste
For whatever reason, copy/paste (between host and client) does not work out of the gate here (in my experience) with either tightVNC or realVNC. In order to enable this functionality you will need to do the following:

Enable for THIS session only
Open terminal window (on your Ubuntu box)

su - root (not sudo bash!)
vncconfig &
exit

Note: For some reason the above didn’t work for my co-worker — we then just used the “enable across reboots” below and that worked fine for him. The error message he had received was “No protocol specified”.

Enable across reboots

emacs /etc/X11/Xsession

Just below the PROGNAME=Xsession line add the following:

# Enable copy/paste with vnc sessions
/usr/bin/vncconfig &

If everything worked then you should now have a box on the screen with a few options. You can just minimize this.
This is a moderately modified HowTo of an original article [Sarah Happy]

Posted in VNC

Corrections? Questions? Comments?

Find an error?
Everything work out great for you?
Have some feedback?
Like to see something added to the article?

PLEASE leave us a comment after the article and let us know how we are doing, or if something needs corrected, improved or clarified.

Thank you!
- The Management

Advertisement

Sudo Bash
By Geeks - For Geeks

Back to Top