• Home
  • Shell
    • Emacs
    • Perl
    • screen
    • sed
  • Ubuntu
    • VNC
  • Web Development
    • Javascript
    • Joomla
    • MySQL
    • osTicket
  • Windows
    • Gimp

BASH> Colorize your ‘cat’ output

Apr07
2011
Written by Scott Rowley

Ok, well thats a bit misleading. We won’t actually be using ‘cat’ but ‘pygmentize’ and its not perfect, but its better than 1 single color

This runs on Debian/Gentoo based Linux systems

apt-get update
apt-get install pygmentize

Once thats been installed what I did was to make an alias in my .profile

alias pcat='pygmentize'

Make sure to reload your .profile if you’ve added your alias

cd ~
. .profile

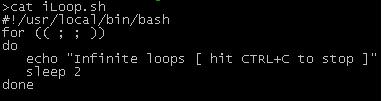
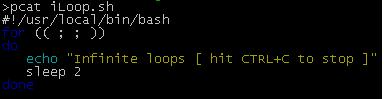
Example cat and pcat outputs:
Cat OutputPygmentize Output

Posted in BASH - Tagged alias, BASH, cat, pcat, pygmentize, ubuntu

osTicket> Auto-Assignment Rules

Apr06
2011
Written by Scott Rowley

The following is a MOD that I wanted to have for work and I noticed that several people have requested it in different threads on the forum over the years. This has been tested and is functional with 1.6RC5 AND 1.6ST

osTicket Auto-Assignment Rules

Purpose: Auto-assign tickets that are submitted via email based on their from address or Subject. If a ticket is assigned to a staff member it will automatically also be assigned to the department they are in.

READ MORE »

Posted in MySQL, osTicket - Tagged assign, auto, mod, modification, osTicket, php, ticket

Web Dev> Password protect apache directory with LDAP & .htaccess

Apr06
2011
Written by Scott Rowley

First thing you’ll need to do is to enable the needed mods, ldap.load & authnz_ldap.load These come preloaded with most linux, you’ll just need to enable them.
On Ubuntu:

Enable LDAP Authentication

cd /etc/apache2/mods-enabled
ln -s ../mods-available/ldap.load ldap.load
ln -s ../mods-available/authnz_ldap.load authnz_ldap.load
apache2ctl graceful

.htaccess

You should now be able to implement the following wherever desired:
Example .htaccess file

Order deny,allow
Deny from All
AuthName "Restricted Page - login with LDAP credentials"
AuthType Basic
AuthBasicProvider ldap
AuthzLDAPAuthoritative on
AuthLDAPUrl ldap://ldap.example.com/ou=admins,o=LDAPROOT?adminUser
AuthLDAPGroupAttribute memberUid
AuthLDAPGroupAttributeIsDN off
Require valid-user
Satisfy any
<Files .htaccess>
order allow,deny
deny from all
</Files>

Note that ‘?adminUser’ on the end of the AuthLDAPUrl line is whatever object you use in your configuration.

Apache Config

/etc/apache2/sites-available/default
Make sure the following is set (the default is AllowOverride AuthConfig)

AllowOverride All
Posted in Ubuntu, Web Development - Tagged htaccess, ldap, password, protect, security, ubuntu

Web Dev> Force users from http to https

Apr05
2011
Written by Scott Rowley

Tested and verified working for *nix servers:

Add the following to your .htaccess file in the root of your website:

Options +FollowSymlinks
RewriteEngine on
RewriteCond %{SERVER_PORT} =80
RewriteRule ^(.*) https://%{SERVER_NAME}%{REQUEST_URI}

I don’t work with IIS so check the following link for information on setting up the redirect on IIS servers:
http://www.sslshopper.com/iis7-redirect-http-to-https.html

Posted in Ubuntu, Web Development, Windows - Tagged apache, follow, force, htaccess, http, https, IIS, nix, options, rewrite, server, symlinks, user

Ubuntu 10.10 VNC Login Screen

Apr04
2011
Written by Scott Rowley

This procedure starts from a fresh install of Ubuntu-Desktop-10.10. This will allow for a graphical interface where none otherwise exists (such as is needed with remote desktop connection). Bear in mind that with VNC you will not have any sound as its not capable (at least not yet)

Login Screen Desktop

install xdm, vnc4server, and xinetd.

sudo apt-get install xdm vnc4server xinetd

When asked during installation what the default display manager should be, keep the setting as gdm.

Configure xdm to be able to answer XDMCP requests, comment out the following line in /etc/X11/xdm/xdm-config:

! SECURITY: do not listen for XDMCP or Chooser requests
! Comment out this line if you want to manage X terminals with xdm
!DisplayManager.requestPort: 0

Configure XDM to answer XDMCP requests from localhost, and to listen to just localhost by adding the following lines to /etc/X11/xdm/Xaccess:

localhost
LISTEN localhost

Configure XDM to not bring up a physical display by commenting out the following line in /etc/X11/xdm/Xservers:

#:0 local /usr/bin/X :0 vt7 -nolisten tcp

Configure the startup script to allow XDM to start despite gdm taking care of the screen by removing /etc/X11/default-display-manager:

sudo mv /etc/X11/default-display-manager /etc/X11/default-display-manager.original
emacs /etc/X11/default-display-manager (to contain ONLY the following):
/usr/bin/xdm

Add the VNC port definition to /etc/services if it has not already been added:

vnc 5900/tcp

Configure the VNC incoming port by creating /etc/xinetd.d/vnc:

service vnc
{
     only_from = localhost 192.168.0.1/24
     disable = no
     id = vnc
     socket_type = stream
     protocol = tcp
     wait = no
     user = nobody
     server = /usr/bin/Xvnc4
    server_args = -geometry 1650x950 -inetd -query localhost -once -SecurityTypes=None -pn -fp /usr/share/fonts/X11/misc/,/usr/share/fonts/X11/75dpi/,/usr/share/fonts/X11/100dpi/ -desktop Ubuntu
     log_on_failure += USERID
}

Feel free to modify these options (such as your “only_from” to be your actual network or IP — and geometry to be your desired resolution)

After all these pieces are done, restart the services to load the new configurations:

sudo /etc/init.d/xdm restart
sudo /etc/init.d/xinetd restart

Now you should be able to use VNC to get a login screen.

There is a problem with gnome in this setup where it has a keyboard shortcut assigned to ‘d’, which can be fixed by going into System -> Preferences -> Keyboard Shortcuts and disabling, or reassigning the “Hide all normal windows and set focus to the desktop” shortcut key (source). This may happen because the default key binding is Mod4+D, and there is no Mod4 modifier key on the VNC connection.

Enabling copy/paste
For whatever reason, copy/paste (between host and client) does not work out of the gate here (in my experience) with either tightVNC or realVNC. In order to enable this functionality you will need to do the following:

Enable for THIS session only
Open terminal window (on your Ubuntu box)

su - root (not sudo bash!)
vncconfig &
exit

Note: For some reason the above didn’t work for my co-worker — we then just used the “enable across reboots” below and that worked fine for him. The error message he had received was “No protocol specified”.

Enable across reboots

emacs /etc/X11/Xsession

Just below the PROGNAME=Xsession line add the following:

# Enable copy/paste with vnc sessions
/usr/bin/vncconfig &

If everything worked then you should now have a box on the screen with a few options. You can just minimize this.
This is a moderately modified HowTo of an original article [Sarah Happy]

Posted in Ubuntu, VNC

BASH> Check for last day of the month

Apr01
2011
Written by Scott Rowley

Script is meant to be used with other scripts in order to determine if it is the last day of the month. Useful for making sure a particular script runs at the end of the month. Just add a cron job that checks this every day at the time you would want your code run if it was indeed the last day of the month.

2 0 * * * /usr/bin/last-day-of-the-month.sh
#!/usr/bin/bash
# last-day-of-the-month.sh
# By: Scott Rowley
# http://www.sudobash.net/
#########################################
TODAY=`/usr/local/bin/date +%d`
TOMORROW=`/usr/local/bin/date +%d -d "1 day"`
# See if tomorrow's day is less than today's
if [ $TOMORROW -lt $TODAY ]
then
echo "Today is the last day of the month, running code…"
/run/your/code
fi
exit 1
Posted in BASH

BASH> sudo bash

Mar31
2011
Written by Scott Rowley

*Note — This is not an original sudobash.net article — credit goes completely to
http://www.gratisoft.us/sudo/man/1.8.0/sudo.man.html. But I know people use search engines on ‘sudo bash’ and end up here so why not provide the answer as well? 😉

sudo, sudoedit — execute a command as another user

SYNOPSIS

sudo [-D level] -h | -K | -k | -V
sudo -v [-AknS] [-a auth_type] [-D level] [-g group name|#gid] [-p prompt] [-u user name|#uid]
sudo -l[l] [-AknS] [-a auth_type] [-D level] [-g group name|#gid] [-p prompt] [-U user name] [-u user name|#uid] [command]
sudo [-AbEHnPS] [-a auth_type] [-C fd] [-D level] [-c class|-] [-g group name|#gid] [-p prompt] [-r role] [-t type] [-u user name|#uid] [VAR=value] [-i | -s] [command]
sudoedit [-AnS] [-a auth_type] [-C fd] [-c class|-] [-D level] [-g group name|#gid] [-p prompt] [-u user name|#uid] file …

DESCRIPTION
sudo allows a permitted user to execute a command as the superuser or another user, as specified by the security policy. The real and effective uid and gid are set to match those of the target user, as specified in the password database, and the group vector is initialized based on the group database (unless the -P option was specified).

sudo supports a plugin architecture for security policies and input/output logging. Third parties can develop and distribute their own policy and I/O logging modules to work seemlessly with the sudo front end. The default security policy is sudoers, which is configured via the file /etc/sudoers, or via LDAP. See the PLUGINS section for more information.

The security policy determines what privileges, if any, a user has to run sudo. The policy may require that users authenticate themselves with a password or another authentication mechanism. If authentication is required, sudo will exit if the user’s password is not entered within a configurable time limit. This limit is policy-specific; the default password prompt timeout for the sudoers security policy is 5 minutes.

Security policies may support credential caching to allow the user to run sudo again for a period of time without requiring authentication. The sudoers policy caches credentials for 5 minutes, unless overridden in sudoers(5). By running sudo with the -v option, a user can update the cached credentials without running a command.

When invoked as sudoedit, the -e option (described below), is implied.

Security policies may log successful and failed attempts to use sudo. If an I/O plugin is configured, the running command’s input and output may be logged as well.
READ MORE »

Posted in BASH

Web Dev> Report on server script status using popen

Mar24
2011
Written by Scott Rowley

In your PHP page add something like the following:

$variable = popen("path/to/script.sh", 'r');
while (!feof($variable)) {
echo fgets($variable);
flush();
ob_flush();
}
pclose($variable);

Then in your script you can echo the output like normal — though I recommend modifying it to spit out HTML like so:

while [ 1 ]
do
read CURRENT_ACCOUNT || break
echo "Working with account $CURRENT_ACCOUNT…<br />";
done < list_of_accounts.txt

Then when you run the php page your webpage will be updated each time with the output of your script.sh until it is complete, then it will resume with the rest of your php code.

Posted in BASH, Web Development

Javascript> Check for specific email address

Mar16
2011
Written by Scott Rowley
<script>
//function to check for a specific email address
function donotreply()
{
if (document.forms["reply"]["send_to"].value == 'do-not-reply@example.com')
{
alert('You would try to send to the one address yer not allowed to....try again!');
return false;
}
return true;
}
</script>

And the form entries…

<form name="reply" onsubmit="return donotreply()">
<input type="text" name="send_to">
Posted in Javascript

Perl> Useful one-liners

Dec08
2010
Written by Scott Rowley

Remove string from file

perl -ni -e 'print unless /pattern/' /path/to/filename

Replace string with string

perl -p -i -e 's/PATTERN/NEW_ENTRY/g' /path/to/filename

Insert string where delimeter is found
This will replace the original delimiter with the new entry and then add the delimiter so you can use it again in the future.

perl -p -i -e 's/DELIMETER/NEW_ENTRY\n\nDELIMETER/g' /path/to/filename

This will grab anything thats in the standard IPv4 format (anything! not always IPs…but usually).

perl -ne 'print "$&\n" while m#\d+\.\d+\.\d+\.\d+#g' file.txt

Search for and find whole paragraphs containing $string

perl -00ne "print if /$string/i" < file.txt
Posted in Perl - Tagged delimiter, insert, liner, one, one-liner, Perl, remove, replace, string, variable
« Older Entries Newer Entries »

Corrections? Questions? Comments?

Find an error?
Everything work out great for you?
Have some feedback?
Like to see something added to the article?

PLEASE leave us a comment after the article and let us know how we are doing, or if something needs corrected, improved or clarified.

Thank you!
- The Management

Advertisement

Sudo Bash
By Geeks - For Geeks

Back to Top