• Home
  • Shell
    • Emacs
    • Perl
    • screen
    • sed
  • Ubuntu
    • VNC
  • Web Development
    • Javascript
    • Joomla
    • MySQL
    • osTicket
  • Windows
    • Gimp

BASH> ‘sed’ command examples.

Nov15
2010
Written by Scott Rowley

Another list that will grow as I need it…

Remove blank lines from output

sed '/^$/d'

Replace data with new data

sed 's/DATA/NEWDATA/g'

Replace multiple spaces with single space

sed 's/ */ /g'

Replace first instance of string

sed -e 's/pattern/REPLACEMENT/1'
Posted in BASH, sed - Tagged blank, data, empty, output, replace, sed

BASH> ‘find’ examples

Nov12
2010
Written by Scott Rowley

This will be a growing list as I find commands I need…

Find files of .ext that are 0 bytes and rm them.

find . -name "*.ext" -size 0 -exec rm {} \;
Posted in BASH - Tagged BASH, byte, example, find, rm, shell

BASH> Variable checking

Nov11
2010
Written by Scott Rowley

Check the variable is a whole number

if [ $VARIABLE -eq $VARIABLE 2> /dev/null ]; then
echo $VARIABLE is a number
else
echo $VARIABLE is not a number
fi

Check the variable is not empty

if [ $VARIABLE != "" ] ; then
<code_to_execute>
else
echo "Error: VARIABLE is empty"
fi

or as provided by solstice:

if [ -z "$VARIABLE" ] ; then
echo “VARIABLE is empty”
else
echo “VARIABLE is not empty”
fi

or -n to test if it”s not null

if [ -n "$VARIABLE" ] ; then
echo “VARIABLE is not empty”
else
echo “VARIABLE is empty”
fi

Check the variable is alpha only

if [[ "$VARIABLE" =~ ^[a-zA-Z]+$ ]] ; then
echo "Variable contains letters only"
else
echo "Error"
fi
Posted in BASH

osTicket> Send reply to alternate/additional email address(es).

Nov09
2010
Written by Scott Rowley

I’m setting up another install of osTickets for another department (that needs a whole other server). In the process it was requested that they be able to change who the response address is incase they need to send it along to someone else or in order to include multiple addresses. The following is a simple MOD I came up with that seems to work as desired. As always please let me know if you have any questions or notice any problems.
This has been implemented with 1.6RC and 1.6ST and both are functional with the exact same code.

Note: This is for use with sending mail via the PHP mail function and is not intended or coded for use with SMTP sending.

include/class.ticket.php
Inside the postResponse function, just before the $sql variable add the following:

 $send_to = $_POST['send_to'];
$cc_to = $_POST['cc_to'];
$bcc_to = $_POST['bcc_to'];
$SENT = "To: $send_to\nCC: $cc_to\nBCC: $bcc_to\n\n";
$response = "$SENT$response";

Now find the following (still inside postResponse):

$body = str_replace('%response',$response,$body);

And below that line add the following line:

$body = str_replace("$SENT",'',$body);

At the bottom of the postResponse function. Find the following code and remove it:

if($email && $email->getId()) {
 $email->send($this->getEmail(),$subj,$body,$file);
 }

Now replace it with:

 // Just in case they wiped out the send address we still need to make sure it gets somewhere.
if($_POST['send_to']){
$email->send($_POST['send_to'],$subj,$body,$file);
}else{
$email->send($this->getEmail(),$subj,$body,$file);
}

Now we need to setup the actual behind the scenes emailing:
include/class.email.php
Find the following

$to=preg_replace("/(\r\n|\r|\n)/s",'', trim($to));

and just after that add:

// Make sure that tickets is sending via php mail function not smtp or this will not work.
$CC = $_POST['cc_to'];
$BCC = $_POST['bcc_to'];

Then just a bit further down we need to add to the headers of the email:

$headers = array ('From' => $from,
'To' => $to,
'Subject' => $subject,
'Message-ID' =>'<'.Misc::randCode(6).''.time().'-'.$this->getEmail().'>',
'X-Mailer' =>'osTicket v 1.6',
'Content-Type' => 'text/html; charset="UTF-8"'
);

For ease of modding just remove all of that and replace it with this:

$headers = array ('From' => $from,
'To' => $to,
'Bcc' => $BCC,
'CC' => $CC,
'Subject' => $subject,
'Message-ID' =>'<'.Misc::randCode(6).''.time().'-'.$this->getEmail().'>',
'X-Mailer' =>'osTicket v 1.6',
'Content-Type' => 'text/html; charset="UTF-8"'
);

Ok, thats the functionality behind it all, now we just need to add the ability to use it…

include/staff/viewticket.inc.php
Search for the following:

<input type="hidden" name="a" value="reply">

Now just below that line add the following code:

<table>
<tr>
<td>To:</td><td><input size=80 type="text" name="send_to" value="<?=$ticket->getEmail()?>"></td>
</tr>
<tr>
<td>CC:</td><td><input size=80 type="text" name="cc_to" ></td>
</tr>
<tr>
<td>BCC:</td><td><input size=80 type="text" name="bcc_to" ></td>
</tr>
</table>

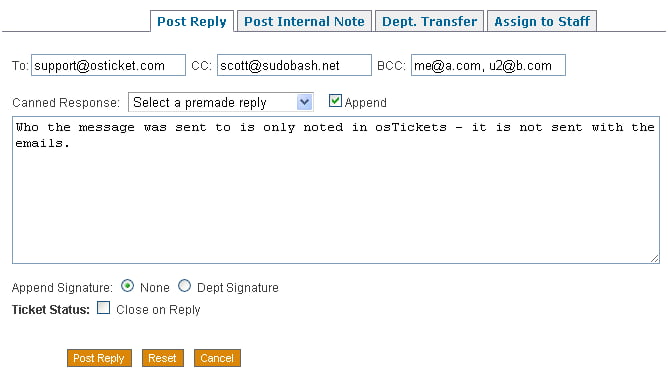
The following picture shows the “To”, “CC” and “BCC” boxes that allows for changing or adding to the email address to send to. This is automatically filled in with the original email address of the ticket submitter. You can send to multiple email addresses by separating the emails with a comma (bob@example.com, bob2@example.com). Its also user proof… if someone wipes out the email address and doesn’t enter in anything then it will default to the original email address.

Well thats very nice but if we don’t note who we sent it to then we could be getting very confused. Please let us know where we sent what responses to. This note is added to the response database entry but is stripped before emailing the response to the customer.

Posted in osTicket - Tagged additional, address, alternate, email, mail, mod, osTicket, reply, send, ticket

Windows> Move your offscreen windows back on screen

Nov03
2010
Written by Scott Rowley

This morning I was majorly annoyed when a Gimp window was offscreen and there was not a damn thing I could figure out to do to finally be able to move it. The standard way to move a window back on screen is to right click on the taskbar item and select move and then use the arrows to move it back. However, since Gimp has these annoying ass multi-windows that wouldn’t work as all it wanted to move was the main window. After some frustrations and googling I finally found the following to work for me.

The window that was off screen was the “Toolbox” window. The top of it was completely off screen so there was no hope of right clicking it and getting into the menu to select move. Well fortunately some of the most annoying things have the simplest answer. All I needed to do was click on the toolbox anywhere so it was the window selected and then hit

Alt-Spacebar

From there I was in the menu and could mouse/arrow down to “move” and then use my arrows as normal to get the bastard back.

Posted in Gimp, Windows - Tagged Gimp, move, screen, window

BASH> Connect to another user’s console terminal using ‘screen’

Nov02
2010
Written by Scott Rowley

Recently, I was helping another Admin and I wanted to be able to share our screens but our IS department won’t allow for it. Being that we were working in a terminal session I decided to go this route instead.

Needed:
– Screen
– Local account on host computer/server for remote user

Install screen

sudo apt-get install screen

Set the screen binary (/usr/bin/screen) setuid root. By default, screen is installed with the setuid bit turned off, as this is a potential security hole.

sudo chmod +s /usr/bin/screen
sudo chmod 755 /var/run/screen

The host starts screen in a local xterm, using the command screen -S SessionName. The -S switch gives the session a name, which makes multiple screen sessions easier to manage.

screen -S screen-test

The remote user (remote_user) uses SSH to connect to the host computer (host_user).

ssh remote_user@server

The host (host_user) then has to allow multiuser access in the screen session via the command ^A :multiuser on (all ‘screen’ commands start with the screen escape sequence, ^A).

^A
:multiuser on

The host (host_user) must grant permission to the remote user (remote_user) to access the screen session using the command ^A :acladd user_name where user_name is the remote user’s login ID (remote_user).

^A
:acladd remote_user

The remote user can now connect to the hosts ‘screen’ session. The syntax to connect to another user’s screen session is screen -x host_user/sessionname.

screen -x host_user/screen-test
Posted in BASH, screen - Tagged BASH, connect, screen, share, terminal, user

MySQL> Epoch to Unix timestamp

Oct29
2010
Written by Scott Rowley
SELECT from_unixtime(epochEntry) FROM table;
Posted in MySQL - Tagged epoch, MySQL, timestamp, unix

MySQL> Easy export/import

Oct29
2010
Written by Scott Rowley

The following is a quick and easy way to export and import a mysql database.
Keep in mind if at the new location the database doesn’t exist you will need to create it first.

Export:

mysqldump -u USER -p DATABASE > backup.sql

Import:

mysql -u USER -p DATABASE < backup.sql
Posted in MySQL - Tagged backup, export, import, MySQL, mysqldump

Windows> Add Windows 7 Snap feature to XP

Oct28
2010
Written by Scott Rowley

Check out the following software for an excellent version of Windows 7 snap for your Windows 2000, XP, Vista and even improve on a Windows 7 box.

http://www.nurgo-software.com/products/aquasnap
Posted in Windows - Tagged 7, aero, aqua, nurgo, snap, Windows

Windows> Save & Restore icon locations

Oct27
2010
Written by Scott Rowley

If you are like me and need to remote desktop into your work PC (or any PC) you may run into the problem of all your icons being rearranged as you change resolutions. I especially run into the problem as I remote in from my laptop into my desktop that has dual monitors. I recently found and tested the following software and so far its working great for me:

Desktop Restore

All you need do is:

1. Install the software (takes seconds)
2. Arrange the icons the way you want them
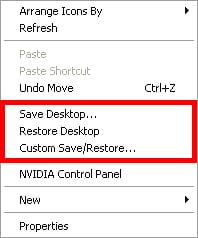
3. Right click on your desktop

4. Select save

Now after you have remoted in to your desktop and then logged back out, when you get back to your desktop just right click and select “Restore Desktop” and instantly your icons are back to their saved locations.

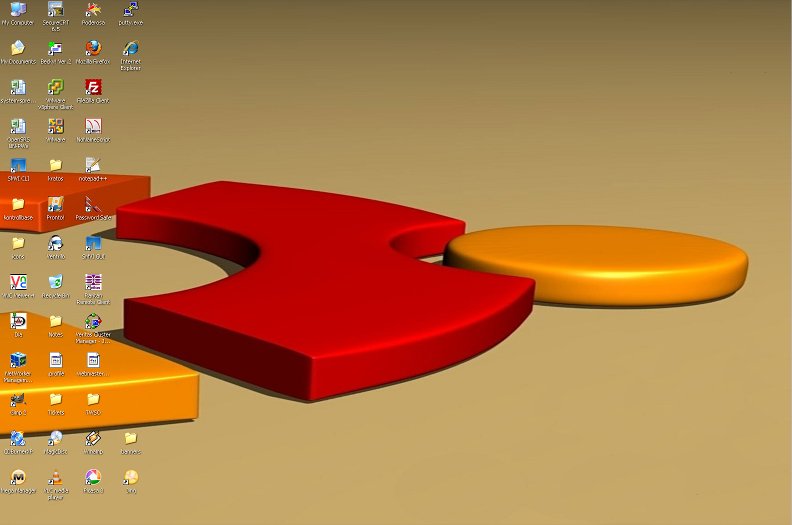
From “ah what the hell?!”

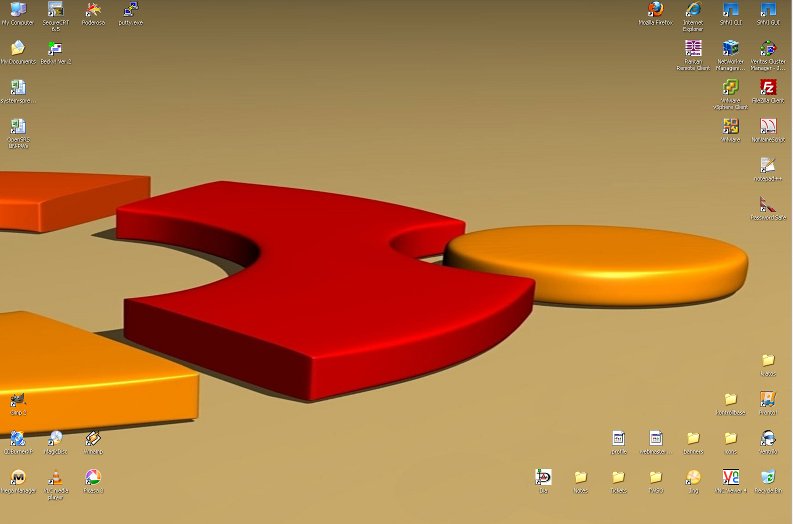
To glorious organization restored.

Posted in Windows - Tagged grid, icon, locations, restore, save, software, Windows
« Older Entries Newer Entries »

Corrections? Questions? Comments?

Find an error?
Everything work out great for you?
Have some feedback?
Like to see something added to the article?

PLEASE leave us a comment after the article and let us know how we are doing, or if something needs corrected, improved or clarified.

Thank you!
- The Management

Advertisement

Sudo Bash
By Geeks - For Geeks

Back to Top