Another starter article to grow with my needs, we’ll start off with the shebang, or bang…or simply “!”. The first two commands I believe are the most useful and could be commonly used. Note that some of these can be a bit difficult to remember, we’ll also go over making aliases so we can use something a little easier to remember in a later article.
READ MORE »
Linux> Command line shortcuts
Web Dev> Password protect webpage(s) with PHP & LDAP
The title says it all, this will allow you to restrict the access to a page or pages running php with access to LDAP. I’ve used this a few times for some internal things we don’t want everyone getting access to or similar scenarios. As always if it works for you, please leave a comment and if it doesn’t please leave a question and I’ll see what I can do to help you out.
Enable LDAP
First thing you’ll need to do is to install ldap for php & enable the needed mods, ldap.load & authnz_ldap.load
On Ubuntu:
apt-get update

apt-get install php5-ldap

cd /etc/apache2/mods-enabled

ln -s ../mods-available/ldap.load ldap.load

ln -s ../mods-available/authnz_ldap.load authnz_ldap.load

apache2ctl graceful
AWK> Useful examples
Just a starter page that will grow as I find useful awk commands to share.
Convert Linux .txt to Windows .txt
Replace the end of a line with a carriage. Useful for converting .txt files from Linux to Windows.
awk 'sub("$", "\r")' linuxfile.txt > windowsfile.txt
Convert Windows .txt to Linux .txt
And the reverse. Useful for converting .txt files from Windows to Linux.
awk '{ sub("\r$", ""); print }' windowsfile.txt> linuxfile.txt
osTicket> View headers for original email message
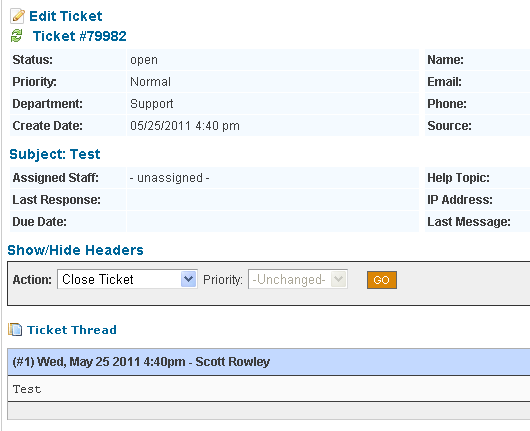
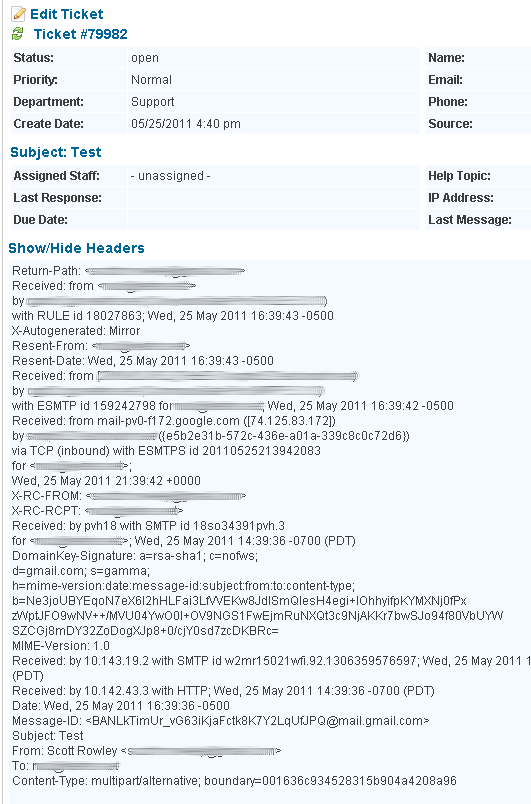
This MOD will allow you to view the original email message headers. The headers also take alot of screen space so we have them “hidden” by default but you can click a link to expand and view them.
1.6ST: If you have not yet modified include/staff/viewticket.inc.php or scp/js/scp.js then you can simply download the following files and replace them. As always, make backups of your local files first.
Download
| Hidden | Shown |
 |
 |
HTPC> Setup Windows 7 as a Media Center with XBMC
The following is an article I came up with after setting up my HTPC with XBMC for the 2nd time. I originally had Boxee on it and I do like Boxee — but I just don’t use the online content that much and XBMC is slightly more customization friendly. At any rate — this is what I’ve come up with. If you find it useful, have questions or comments please leave me a message in the comments below the article.


Assumptions: You have Windows 7 installed on a desktop PC.
Download & Install XBMC — http://xbmc.org/download/
Setup XBMC to see your Media
Videos> Add source> Browse> Find & Select Folder containing your Movies
– If you have additional locations click the Add button and then Browse to locate
– Repeat for as many locations as necessary
Once you have all of your Movie paths entered you can navigate down to the bottom and change the name, I recommend “Movies”.
Click OK
Select a “Scraper” to retrieve movie information — For movies you will want to select (Movies) themoviedb.org.
Click OK
Repeat the same steps for TV, selecting the appropriate scraper for TV.
Videos> Highlight “Movies”> Hit “C” and select the “Scan for new content”.
Wait for it to finish adding content then repeat for any other media you added, such as “TV”.
Once you have content you can now change how your Skin looks — I prefer to have “Videos” replaced by “Movies” and “TV Shows”
System> Skin>
– Select “Hide — Videos”
– Deselect “Hide — Movies” and “Hide — TV shows”
– Show/Hide anything else you want to.
Now we’ve got our basic setup completed. If you want a simple setup that you can turn on manually and watch movies/tv you can stop here. If you want a HTPC that will power itself off at night,
turn itself on in the morning, boot straight into XBMC, and can be controlled by your phone — then the rest of this tutorial is for you.
Windows> Batch convert video with Handbrake
The following code is setup for use with a Nook Color, but you could change the resolution for use with other devices as well. If you have any that you find work well for you please post them in the comments and I will extend the article.
First off, if you don’t already have it you obviously need Handbrake
Thanks to RedShirt for the original code.
handbrake_nook.bat
:: http://www.sudobash.net?p=594
:: Nook Color
@echo off
FOR /F "tokens=*" %%G IN ('DIR "%~1" /B /S /A:-d') do (
FOR /F "tokens=*" %%H IN ('DIR "%%G" /B /A:-d') do (
:: This assumes you have the default install location on Windows 7.
"C:\Program Files (x86)\Handbrake\HandBrakeCLI" -e x264 -2 -b 702 -a 1 -E faac -B 48 -6 mono -R Auto -D 0.0 -f mp4 -I -X 854 -m -x level=30:cabac=0:ref=1:analyse=all:me=umh:no-fast-pskip=1:psy-rd=0,0:bframes=0:weightp=0:subme=6:8x8dct=0:trellis=0 -D 1.5 -i "%%G" -o "C:\Users\YOUR_LOGIN_NAME\Videos\transcode\%%H-NOOK.mp4"
)
)
handbrake_kfire.bat
:: http://www.sudobash.net?p=594
:: Kindle Fire
@echo off
FOR /F "tokens=*" %%G IN ('DIR "%~1" /B /S /A:-d') do (
FOR /F "tokens=*" %%H IN ('DIR "%%G" /B /A:-d') do (
:: This assumes you have the default install location on Windows 7.
"C:\Program Files (x86)\Handbrake\HandBrakeCLI" -e x264 -2 -b 702 -a 1 -E faac -B 48 -6 mono -R Auto -D 0.0 -f mp4 -I -X 1024 -m -x level=30:cabac=0:ref=1:analyse=all:me=umh:no-fast-pskip=1:psy-rd=0,0:bframes=0:weightp=0:subme=6:8x8dct=0:trellis=0 -D 1.5 -i "%%G" -o "C:\Users\YOUR_LOGIN_NAME\Videos\transcode\%%H-FIRE.mp4"
)
)
Make sure the entire command is all on one line with no line breaks or wrapping or this will not work. Don’t forget to change your destination directory to reflect your own login name. Also make sure that the entire destination path exists (by creating the “transcode” directory). Don’t worry about “Videos”, Windows sees that the same as “My Videos”.
Note: This code references the (x86) Program Files. If you are not running 64 bit then this will not be an accurate location:
Untested — Remove ” (x86)” for use on non 64-bit Windows
Now, you can either place the batch file wherever you like and then run it from the command line like so:
handbrake_nook.bat
Or you can run the bat file right from the same directory the video files are in and supply no directory, such as:
handbrake_nook.bat
To Do: Have a nightly check to see if there are any files in the selected directory. If so — convert them and then move the originals to another folder.
Contact Dell via Chat support
Really? Why does this need to be a tutorial? Sadly it does, and thats probably why you are here reading this. So hopefully this will help you out and you’ll have one less frustration.
First we’ll browse to their site:
http://dell.com
In the search box type in “chat”

Select the middle button “Chat Now>”

READ MORE »
Web Dev> Meta-Redirect
I keep forgetting this and I keep needing it — so I’m just finally going to make note of it here:
<meta HTTP-EQUIV="REFRESH" content="0; url=http://www.yourdomain.com/index.html">
The zero in this case is the amount of time before a reload (so if you wanted to you could say something like “This page is no longer here — redirecting you in 3 seconds” and then change it to a 3. This code needs to be placed within the <head> tags.
Web Dev> Allow users to upload multiple files
In this particular example we are allowing users to upload up to 4 image files at a time (we will specify jpeg, jpg, gif, png, and bmp to be allowed). We will also restrict the size to less than 2mb (16777216 bits)
First we need the page containing our form for uploading the files:
file.php
<form enctype="multipart/form-data" action="upload.php" method="post">
Image1: <input name="file[]" type="file" /><br />
Image2: <input name="file[]" type="file" /><br />
Image3: <input name="file[]" type="file" /><br />
Image4: <input name="file[]" type="file" /><br />
<input type="submit" value="Upload" />
</form>
Now we need the file that will actually do all the work:
upload.php
<?php
$success = 0;
$fail = 0;
$uploaddir = 'images/';
for ($i=0;$i<4;$i++)
{
if($_FILES['file']['name'][$i])
{
// Allow only up to 2mb images
if($_FILES['file']['size'][$i] < 16777216){
$uploadfile = $uploaddir . basename($_FILES['file']['name'][$i]);
$ext = strtolower(substr($uploadfile,strlen($uploadfile)-3,3));
if (preg_match("/(jpeg|jpg|gif|png|bmp)/",$ext))
{
if (move_uploaded_file($_FILES['file']['tmp_name'][$i], $uploadfile))
{
echo " http://example.com/" . $uploadfile . "<br>";
$success++;
}
else
{
echo "Error Uploading the file. Retry after sometime.\n";
$fail++;
}
}
else
{
$fail++;
}
}else{echo "Error uploading file, file is too large";
$fail++;}
}
}
if($success > 0){
echo "<br>Number of files successfully uploaded: " . $success;
}else{
echo "<br>Number of files failed: " . $fail;
}
?>
Web Dev> HTML form ‘Back’ button
It may be necessary at some point to send a user back to a previous page. This could be useful in cases such as errors or letting a customer review information and go back to change it.
<form><input type="button" value="Back" onClick="history.go(-1);return true;"></form>
The -1 indicates to go back a single page.
